VRKB Manual: Virtual Reality Keyboard
- Online documentation: https://awesomesaucelabs.github.io/vrkb-manual
- Support e-mail: awesomesaucelabs@gmail.com
Table of Contents
- Introduction
- Requirements
- Features
- Setup
- VRKB Usage
- Example Scenes (Oculus/SteamVR1/SteamVR2)
- Implementation
- Keyboard Customization
Introduction

VRKB (Virtual Reality KeyBoard) is a paid Unity asset that provides a keyboard for typing text in VR. The keys are struck with virtual mallets, providing an experience similar to playing a xylophone or a drum kit. This typing method is (in the author’s humble opinion) significantly more intuitive and efficient than the various laser-pointer-style keyboards currently in popular use.
VRKB setup video: https://youtu.be/J1dHujWH23s
Requirements
- Unity 5.5 or newer
- TextMesh Pro asset (free)
- VR HMD with 6DOF controllers (e.g. Oculus, HTC Vive)
VRKB bundles the Newtonsoft’s Json.NET library for parsing JSON files under Assets/VRKB/Dependencies/Newtonsoft/Newtonsoft.Json.dll. If you already have a Json.NET DLL in your project, please remove the Assets/VRKB/Dependencies directory to resolve any build errors related to Json.NET.
Features
- Intuitive and efficient text entry in VR
- Works with any VR SDK that supports 6DOF controllers (e.g. Oculus, SteamVR)
- Straightforward setup process (see below)
- Access to all ASCII characters, including lowercase/uppercase letters, numbers, and symbols
- Key autorepeat with adjustable delay and repeat rate
- Customizable key mappings/labels/icons via JSON configuration file
- All source code included. The code only depends on TextMesh Pro, and has no dependencies on particular VR SDKs.
- Excellent framework for implementing your own custom VR keyboard, if desired.
Setup
Setup Steps (Brief)
- Install TextMesh Pro from Unity Package Manager
- Install VRKB from Unity Asset Store
- Create minimal VR scene
- Drag VRKB
KeyboardPrefabinto VR scene - Drag VRKB
MalletPrefabonto VR controllers
Setup Steps (Detailed)
This section provides detailed setup instructions for VRKB. If you prefer, the VRKB setup video provides a walkthrough of the steps described below: https://youtu.be/J1dHujWH23s.
Step 1: Install TextMesh Pro
For Unity 2018 or newer, there are two ways to install TextMesh Pro: (1) via the Unity Asset Store (the old way), and (2) via the Unity Package Manager (the new way). (If the reader is curious, the following Unity Forum post provides background on the differences between the two installation methods, and the reasons for the change: https://forum.unity.com/threads/migrating-from-legacy-asset-store-to-package-manager-releases.511748/).
In order for VRKB to work correctly in Unity 2018 and later, you must install TextMesh Pro from the Unity Package Manager (not the Unity Asset Store!). Otherwise, all references to TextMesh Pro scripts from the VRKB keyboard prefab will be broken and no text will appear on the keys.
Fear not, though! Installing TextMesh Pro from the Unity Package Manager is an easy process:
- Open the Unity Package Manager window (
Window => Package Manager) and find TextMesh Pro in the package list. Click the install button if the package is not already installed. - Copy essential TextMesh Pro files into the project by selecting
Window => TextMesh Pro => Import TMP Essential Resources.
If you are using a Unity 2017 or older, you should install TextMesh Pro from the Unity Asset Store instead. VRKB will work fine in this case, because the Asset Store provides a different version of VRKB in Unity 2017 and older.
Step 2: Install VRKB
Install VRKB from the Unity Asset Store.
Step 3: Create a Minimal VR Scene
If you don’t already have a VR SDK installed, install a VR SDK such as the “Oculus Integration” asset or the “SteamVR” asset from the Unity Asset Store, depending on what is appropriate for your VR HMD.
Then, set up a minimal VR scene:
- Select
File => New Scenein the Unity Menu. - Delete the default Unity camera (“Main Camera”).
- Drag the Oculus/SteamVR camera prefab into the scene.
For both Oculus and Steam VR, the camera prefab contains game objects that represent the VR controllers and headset.
Step 4: Drag the VRKB KeyboardPrefab into your Scene
Drag the VRKB keyboard prefab (Assets/VRKB/Prefabs/KeyboardPrefab) into your scene.
Step 5: Drag the VKRB MalletPrefab onto the VR Controllers
Drag the VRKB mallet prefab (Assets/VRKB/Prefabs/MalletPrefab) onto the game objects for the left/right VR controllers. (The VR controller objects are located under the Oculus/SteamVR camera prefab.)
VRKB Usage
Retrieving Text from The Keyboard
Note: The VRKB setup video demonstrates how to retrieve text from the keyboard using an “OnConfirm” callback: https://youtu.be/J1dHujWH23s.
The recommended method to obtain text from the keyboard is to set a callback method for the keyboard’s OnConfirm event in the Unity Inspector (depicted below). The keyboard’s “OnConfirm” event is triggered whenever the user presses the green checkmark key, which serves the same function as the Enter key on most keyboards. Callback methods for an “OnConfirm” event are passed a single string argument which contains the current content of the keyboard’s input area.
Hitting the green checkmark key triggers VRKB’s ‘OnConfirm’ event/callbacks.
Keyboard Settings
Settings for the keyboard can be accessed in the Inspector by selecting the root of the keyboard prefab (Assets/VRKB/Prefabs/KeyboardPrefab). The settings are managed by the KeyboardBehaviour component:
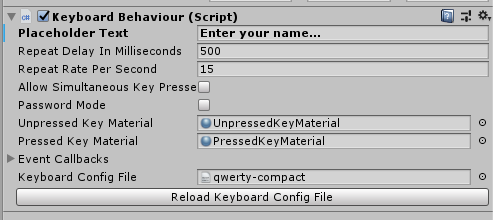
| Parameter | Description |
|---|---|
| PlaceholderText | Message shown in the input area before the user starts typing. |
| RepeatDelayInMilliseconds | Length of time key must be pressed before it starts repeating. |
| RepeatRatePerSecond | The rate at which a key repeats when it is held in a pressed state. |
| AllowSimultaneousKeyPresses | If true, allow two or more keys to be pressed simultaneously with the mallet. Setting this to false helps to reduce typing errors. |
| PasswordMode | Show all input text as wildcard characters (“*”). This is helpful if a user is entering a password and wants to keep it hidden from possible observers. |
| UnpressedKeyMaterial | The material use for a key that is the unpressed state. Change the referenced material to change the colors of the keyboard keys when they are in an unpressed state, as well as other visual properties. |
| PressedKeyMaterial | The material use for a key that is the pressed state. Change the referenced material to change the colors of the keyboard keys when they are in an pressed state, as well as other visual properties. |
| EventCallbacks | Expand this section to configure callback methods for keyboard events (e.g. OnKeyPress, OnConfirm). See Keyboard Events for details. |
| KeyboardConfigFile | JSON configuration file which controls the output mappings, character labels, and icons for the individual keys. |
| ReloadKeyboardConfigFile | Reload key settings from the JSON config file and apply them to the keys. (The config file is always reloaded upon entering Play Mode, but otherwise reloads must be triggered manually with this button.) |
Keyboard Events
The Event Callbacks section of the KeyboardBehaviour Inpector allows you to register callbacks methods for the following keyboard events.
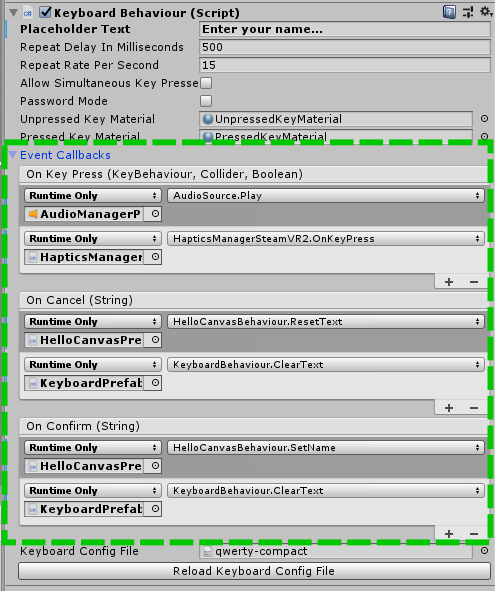
OnKeyPress
A list of callback methods that are invoked each time a key is pressed. This event is useful for triggering actions such as playing a key clicking sound or generating haptic feedback on the VR controller(s).
Callback methods for this event are passed the following parameters:
| Argument Type | Description |
|---|---|
| KeyBehaviour | the key that was pressed |
| Collider | the collider that pressed the key (usually a mallet) |
| bool | true if this key press event was generated by autorepeat |
OnCancel
A list of callback methods that are invoked when the user presses the “cancel” key. (On the default keyboard, the red “X” key is the cancel key.) This event is useful for resetting various program state after the user cancels his/her input (e.g. hiding the keyboard, closing a dialog box).
Callback methods for this event are passed the following parameters:
| Argument Type | Description |
|---|---|
| string | text that user has typed prior to hitting the cancel key |
OnConfirm
A list of callback methods that are invoked when the user presses the “confirm” key. (On the default keyboard, the green checkmark key is the confirm key.) This event is useful for grabbing the input text from the keyboard after the user has confirmed that it is correct.
Callback methods for this event are passed the following parameters:
| Argument Type | Description |
|---|---|
| string | text that user has typed prior to hitting the confirm key |
Example Scenes (Oculus/SteamVR1/SteamVR2)
The Assets/VRKB/Examples directory provides minimal “Hello, World!”-type examples of VRKB usage with Oculus, SteamVR 1, and Steam VR 2 SDKs. I walk through the creation the example scene in the VRKB setup video at https://youtu.be/J1dHujWH23s
The example scenes are provided as .unitypackage files within the Assets/VRKB/Examples directory, so you will need to double-click on them in order to unpack the files and add them to the project. (I bundled the example scenes as .unitypackages so that VRKB would not have any dependencies on specific VR SDKs.)
For the smoothest experience (i.e. to avoid compiler errors), it is best to install the relevant VR SDK(s) from the Unity Asset Store before unpacking the example scene(s).
Implementation
How It Works
The main object of interest in VRKB is the keyboard prefab (Assets/VRKB/Prefabs/KeyboardPrefab), which combines the game objects for the keys, keyboard backplate, and input preview area into a functional whole. The 3D positioning of the individual keys is largely automated by nested use of LinearLayoutBehaviour, a simple script that positions child objects at equidistant intervals along a chosen axis (X, Y, or Z). In addition, some manual positioning was necessary to accomodate keys of different sizes (e.g. modifier keys, spacebar). The meshes for the individual keys are cuboids with rounded corners, and are generated procedurally by the RoundedRect script. In the author’s opinion, these rounded shapes look much better than using plain old boxes for the keys, even though the latter would have been much simpler to implement and understand.
To detect keypresses, both the keys and the mallet heads have Unity collider components (BoxCollider and SphereCollider, respectively). Whenever the colliders intersect, the Unity physics system invokes the special OnTriggerEnter method of KeyBehaviour, which in turn calls KeyboardBehaviour.KeyPress on the parent keyboard object. It is the KeyboardBehaviour.KeyPress method that actually performs the relevant action for the key press, such as outputting a character to the preview area or triggering a set of event callbacks.
The keyboard allows for custom key mappings via a JSON file, in order to change the output characters generated by particular keys, the labels/images shown on the keys, and so on (see Customizing Key Mappings). The key configurations are read from the JSON config file and propagated to the individual keys by the KeyboardBehaviour component, located at the root of the keyboard prefab. KeyboardBehaviour script also implements keyboard-wide settings such as repeat rate and event callbacks, as described in Keyboard Settings.
Source Code Documentation
The Doxygen-generated Files List provides an annotated file tree with one-line descriptions of the various source files and asset files contained in the VRKB project. If you are planning to dig into the source code, I believe this page should be quite helpful for gaining an initial understanding of the code structure.
Keyboard Customization
Customizing Key Mappings
Settings for individual keys, such as the output character(s) generated by a key (i.e. the “key mapping”), the text label shown on a key, and/or the icon shown on a key, can be customized via VRKB’s JSON configuration file (Assets/VRKB/Config/qwerty-compact.json).
The JSON file that is used to configure the VRKB keyboard can be selected in the Inspector for the KeyboardBehaviour component, which is attached to the root of the keyboard prefab (Assets/VRKB/Prefabs/KeyboardPrefab), as shown below.
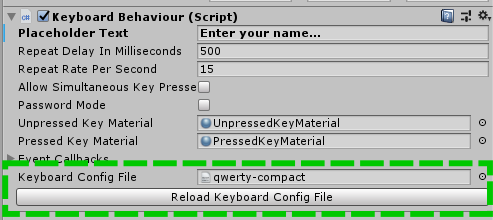
Please note that VRKB does not automatically detect changes to the JSON config file, so you will need manually reload the config file before your edits will take effect, using the Reload Keyboard Config File button. The config file is always reloaded when entering Play Mode.
Key Settings
Most of the JSON config file consists of dictionary entries specifying settings for individual keys, such as the following:
"key0": { "output": "q", "label": "q" },
This entry says that the key named “key0” should generate the output string “q” when pressed, and should also be labeled with the text “q”.
In order for a dictionary entry to be correctly mapped to the corresponding key, the game object for the key must:
- Have a name that exactly matches the JSON dictionary key (e.g. “key0”).
- Have a
KeyBehaviourcomponent. - Be a descendant of the root keyboard object (i.e. the game object with a
KeyboardBehaviourcomponent).
The complete list of settings available for individual keys are:
| Setting | Possible Values | Description |
|---|---|---|
| “action” | “cancel”, “confirm” | Cancels/confirms the text typed by the user and triggers OnCancel/OnConfirm keyboard events (see Keyboard Events) |
| “enableLayerForNextKey” | keyboard layer name | Temporarily enable a keyboard layer for the next key press (see Keyboard Layers) |
| “enableLayer” | keyboard layer name | Enable a keyboard layer (see Keyboard Layers) |
| “fontSize” | float | Font size used for text label |
| “image” | Unity Resource Path | Image shown on key (e.g. green checkmark icon) (see Using Images on Keys) |
| “imageColor” | color name or hex value | Color applied to “image” (e.g. “red” or “#FF0000FF” in RGBA form). Replaces white areas of the image with the specified color. (see Using Images on Keys) |
| “label” | any string | Text used to label a key (e.g. “q”, “Enter”) |
| “output” | any string | The output characters generated when the key is pressed (e.g. “q”, “w”). |
You can specify default values the above key properties by adding a top-level entry to the JSON file called “keyDefaults”. For example, the default JSON config file (Assets/VRKB/Config/qwerty-compact.json) contains a “keyDefaults” entry near the top of the file that looks like:
"keyDefaults": {
  "fontSize": 6.0,
  "imageColor": "black"
},
Keyboard Layers
In the JSON config file, key settings are grouped into layers, where a layer is a group of key settings that are active at the same time. Layers are used to implement the behaviour of the modifier keys such as the Shift key and the Numbers key. For example, when the Shift key is pressed, the shiftLayer is activated and the letter key mappings are changed to their uppercase equivalents. In the default JSON config file, the defaultLayer and shiftLayer are structured as follows:
"defaultLayerName": "defaultLayer",

"defaultLayer": {

  "key0": { "output": "q", "label": "q" },
  "key1": { "output": "w", "label": "w" },
  "key2": { "output": "e", "label": "e" },

  ... MORE KEYS HERE ...

  "key19": { "enableLayerForNextKey": "shiftLayer", "image" : "Images/shift-disabled-icon" },

  ... MORE KEYS HERE ...

},

"shiftLayer": {

  "inheritsFromLayer": "defaultLayer",

  "key0": { "output": "Q", "label": "Q" },
  "key1": { "output": "W", "label": "W" },
  "key2": { "output": "E", "label": "E" },

  ... MORE KEYS HERE ...

},

... MORE LAYERS HERE ...
The important things to note from this example are:
- There is a default layer that is active when the keyboard is first loaded. By convention, this default layer is named
defaultLayer, but a different name may be specified using the top-leveldefaultLayerNameproperty. - The Shift key (i.e.
key19) sets"enableLayerForNextKey": "shiftLayer", which causes the active layer to be changed for the next key press. (There is also anenableLayerproperty which permanently changes the active layer.) - The
shiftLayerinherits key settings fromdefaultLayerusing"inheritsFromLayer": "defaultLayer". This means thatshiftLayerwill have all of the same key mappings asdefaultLayer, except for those key mappings that are explicitly overridden. This saves a lot of tedium when defining special layers. In the case ofshiftLayer, the letter keys are overridden to output uppercase characters, but all of the other keys (e.g. spacebar, backspace key) look and behave exactly the same as fordefaultLayer.
Using Images on Keys
In order to use your own image(s) on a keyboard key, you must first import the image (e.g. a PNG file) into your Unity project using the following steps:
- Copy the image file into your Unity project tree. VRKB uses Unity’s
Resource.Loadmethod to load images, so your image file must be located under a directory calledResources, which in turn must be located under theAssetsdirectory. (See the Unity documentation forResources.Load()for background info.) For example, the icon images for the VRKB keyboard are located inAssets/VRKB/Resources/Images. - Next, you will need to manually import the image by: (1) selecting the image file in the Unity Project view, (2) setting “Texture Type” to “Sprite (2D and UI)” in the Inspector, and (3) clicking “Apply”, as depicted in the example image below.
When you reference the images in the JSON config file, the path should be given relative to the Resources folder and should not include the extension (e.g. “.png”). An example of a correct image path would be:
"key31": { "action": "cancel", "imageColor": "red", "image": "Images/x-mark-circle-icon" },
If possible, I recommend setting the foreground color of your icon images to white and the background color to transparent. This will give you the most flexibility with respect to configuring colors. You will then be able set the imageColor for the key to whatever color you want to replace white, as in the example JSON entry above.
Tips for Building a Custom Keyboard
VRKB provides a suitable framework for designing new VR keyboard with a custom 3D layout, if you are so inclined! Some interesting ideas might be: a curved keyboard, a split keyboard, or a keyboard where the key rows are positioned at different heights (like a typewriter).
If you decide to implement a custom keyboard, I recommend that you begin by reading the How it Works section for some helpful pointers about how the provided keyboard (Assets/VRKB/KeyboardPrefab) is implemented. It may also help to start with a copy of the provided keyboard prefab and make modifications from there.
In general, the 3D positioning of keys can be done using any method you like, whether it be with a 3D modeling program, automatic layout scripts, or manual positioning from inside the Unity editor. The only constraint is that the game objects for the keys (i.e. the game objects with KeyBehaviour components) need to be descendants of the game object for the keyboard (i.e. the object with the KeyboardBehaviour component), so that the settings from the JSON configuration file are correctly propagated to the keys. Please also remember that the names of the game objects for the keys need to match the dictionary keys in the JSON config file. (See Key Settings for an explanation.)